Tag Archives: Snow melting installation tips

Snow Melting System Pre-installation Checklist

What NOT to do When Installing Radiant Heat – Tips and Advice from the Pros

Radiant heat is a proven technology that produces impressive results. But like most products, if the system components aren’t installed correctly, the radiant heat system can’t perform as intended, and the customer is left frustrated and disappointed. Despite the advanced technology involved, installing a radiant heat system is not difficult, but there are some key guidelines to follow to ensure that the system performs as intended. While consumers can buy the best snow melting system components from ProLine Radiant, unless they’re installed correctly the system won’t produce the results you’re expecting.

ProLine is a proven and trusted wholesale radiant heat provider offering snow melting, roof deicing, pipe trace and floor heating solutions. But ProLine isn’t content to simply carry the industry’s premier radiant heat products. ProLine has broken away from the pack by offering and following through with the best customer service in the industry.

ProLine Radiant has built its success upon the industry’s most preeminent customer services. Because proper installation of radiant heat systems is vital, ProLine not only includes installation support services, but offers free installation training courses. Installers can attend via WebX or in person at ProLine’s headquarters. Complete system layout and design AutoCADs with specs are also available, so customers will know proper layout and materials, load calculations, breaker sizes, number of breakers, and other technical aspects of the installation prior to any heat cable being installed. It’s this attention to quality customer service that distinguishes ProLine from the competition, and helps to ensure that each system installed performs as intended.
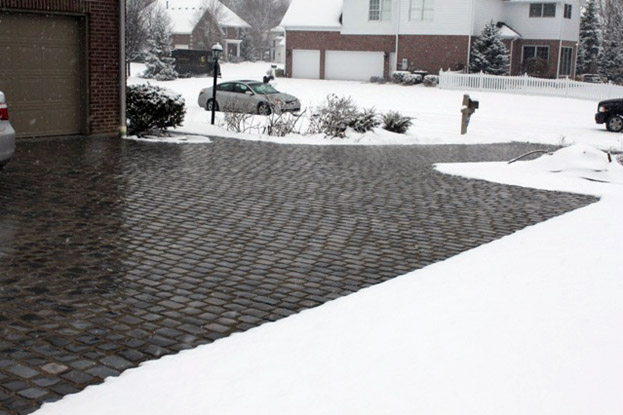
Heated paver driveway and parking area.

In addition to the personal service and support, ProLine continually posts information and tips for installing radiant heat systems. Top quality products are only part of the complete radiant heat solution. “Our product line has proven itself,” stated Brandon Weaver, Director of National Sales for ProLine. “But it’s vital that installers follow a few simple guidelines to install these systems correctly, so that customers can enjoy the full benefit of our premier products. It’s helpful to read the information we post online, and never hesitate to call our tech support team if you have questions during the installation.”

Some of the most common installation mistakes include:

  1. IMPROPER CABLE SPACING. Take the time necessary to layout and then inspect the heat cable to ensure that it’s spaced properly. Follow the basic cable spacing rules: Keep the cable at a minimum spacing of 2 inches and a maximum of 4 inches (center-to-center).
  2. IMPROPER CABLE DEPTH. Don’t let the heat cable rest on the ground before a concrete pour. Use Mesh-Ups to elevate the cable so that it remains in the center of the slab with the remesh. (Mesh-Ups are plastic support ‘chairs’ that are valuable, yet extremely affordable and they can make all the difference in the world between a successful and an unsuccessful installation.) Mesh-Ups keep the heat cable that is secured to the remesh elevated from resting on the ground as the concrete is poured. It’s a simple, affordable solution to keep the heat cable at the ideal distance from the concrete’s surface, thereby resulting in optimum snow melting performance.
  3. NEGLECTED WARRANTY CARD. Too many installers neglect to fill out the warranty card and mail it to the manufacturer. Don’t let this happen.
  4. FORGETTING TO TEST THE CABLE. Do not forget to test the cable during all phases of the installation. Start by testing the cable out of the box and then throughout each aspect of the installation.
  5. COMPROMISED HEAT CABLE. Never cut or damage the heat cable. If you must use steel rakes and shovels, take extreme caution when using these tools during the concrete pour to avoid damaging the heat cable.

One way to limit mistakes during an installation is not only to avoid the above errors, but to follow the handy checklist below:

Pre-installation Checklist

Before buying and installing a radiant heat system, review the checklist below.

  • Verify the correct voltage of the home or business where the system is being installed (220/240 or 110/120).
  • Verify the available amperage. Do not guess or assume. Because of the importance of this information, we recommend having an electrician come to your location to measure the amperage.
  • Hire a trusted electrician, preferably one you’ve worked with before. Let’s face it, not everyone is competent or ethical, so find one who has been in business for several years. Ask around and talk with those who have personal experience with electricians.
  • Keep in mind that the National Electric Code (NEC) requires that the system has 30mA GFEP (30mA trip protection).

After installing your radiant heat system, fill out and mail your warranty card.

Perhaps the most overlooked tip – and one that can eliminate installation mistakes and unhappy customers – is to take advantage of the free training! Call 801.948.7577 or 866.676.9276 to sign up or learn more.


Feedback from the Field

What Separates ProLine Radiant from the Competition? Ask Our Customers:

To all potential ProLine customers,

I am a landscape designer, located on the seacoast of New Hampshire. We get plenty of snow in the winter, and I truly believe that heated driveways and walkways are the next big thing for our area, as in some of the more dense residential areas there is often no place to put the snow. However, before recommending radiant heat to my clients, I needed to try it and live with it myself.

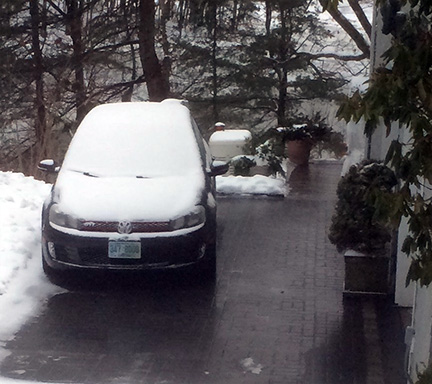
This fall, we installed ProLine heating cables in our driveway. So far we have had two storms, one mainly snow, and the other rain and ice. The driveway performed beautifully. During the snow storm, it melted the snow effortlessly. We had forgotten to put it on automatic so it was off during the first part of the storm. After realizing this, we turned the system on, but not before a couple of inches had already fallen, but it still managed to make up for lost time.

During the ice storm, the driveway was DRY, while everything else was covered in a skin of ice. Great success! I’m not much of a snow lover, but I’m actually looking forward to the next storm!

Heated driveway with brick pavers

Although I am thus far completely sold on the product, the purpose of this letter is really to rave about ProLine’s customer service and support. These days, good customer service is rare, and great customer service is almost nonexistent. ProLine’s service is in the “great” category. For a new customer, with limited experience in outdoor heating, their technical support was crucial. Having a video web chat with Jim and looking at the schematic of the job before we began was one of the reasons for the success of the project. But the step-by-step instruction was only a part of the support that ProLine provided. Throughout the process they were always in touch. Larry, the account manager, was always there to answer questions, even when he was on vacation!

Brandon visited the site twice to answer questions and offer support, and Jim was always on the other end of the phone to talk to my electrician when it was necessary. They seemed to anticipate our needs and fulfill them before we even knew what they were ourselves.

In my years as a homeowner and landscape designer I have dealt with all sorts of people on all sorts of projects, and the service and support that we experienced from ProLine was among the best. It was a breath of fresh air, and I look forward to hopefully doing a lot of business with them in the future.

          – Wickie R., Owner of Drawing Room Ink

Radiant snow melting system heating paver driveway.
ProLine snow melting system installed to heat a paver driveway in New Hampshire.

Other Customer Comments

The first snow fall this winter was the test and the driveway has been ice/snow free all winter! The option to manually turn on the heat system has not been needed since the sensor works so well. My wife and I are very pleased with the results and feel much safer walking outside during the winter now!

          – Dan, heated driveway owner

Thanks for supplying my customer with exactly what they needed. Living in multiple locations, the automated concrete heating system you provided was the perfect match for my customers in Idaho. Being new to this type of installation, I expected things to be a little more complicated. A few phone calls after receiving the product within days made the job simple to install. I would have to say that customer service with your company was by far second to none. I look forward to doing business with you in the future and referring you on to other homeowners with snow melting needs.

          – Cody, Independent Contractor

Learn more about ProLine Radiant’s professional design/layout services and installation support, as well as ProLine’s free installation training by calling a ProLine radiant heat expert today at 866.676.9276.


Snow Melting Systems – Installation Tips

Premier Snowmelt Systems Backed by Unmatched Customer Service
Electric heated driveways continue to gain popularity among professional builders and homeowners alike as they discover the benefits of these maintenance-free snow melting systems. Featuring easy installation, reliable and energy efficient performance, electric snow melting systems offer environmentally friendly operation for clearing driveways, ramps, steps, parking lots and more of snow and ice.

ProLine Radiant’s fully automated snowmelt systems feature an advanced aerial-mount or in-ground snow sensor. When the sensor detects precipitation and the temperature is below the adjustable set point (typically set at 39°F), it sends a signal to the master controller that is usually installed on a wall in the garage. The controller then sends power to the embedded heat cable to warm the surface.

ProLine controllers for in-ground sensors are small (6×3½-inch), NEMA 1, wall-mount control panels that provide UL listed snow melting for large commercial and custom residential and applications. The controller also offers a feature allowing it to be controlled from an external signal (day/week timer, GSM-module or other signal source). The unit features a manual off/on switch (standby) so the heating system can be manually activated to melt snow or ice that occurs because of wind or shade, further enhancing safety.

For snow melting systems to perform as intended, they must be properly installed. Here are a few basic tips for the proper installation of radiant snow melting system heat cable.

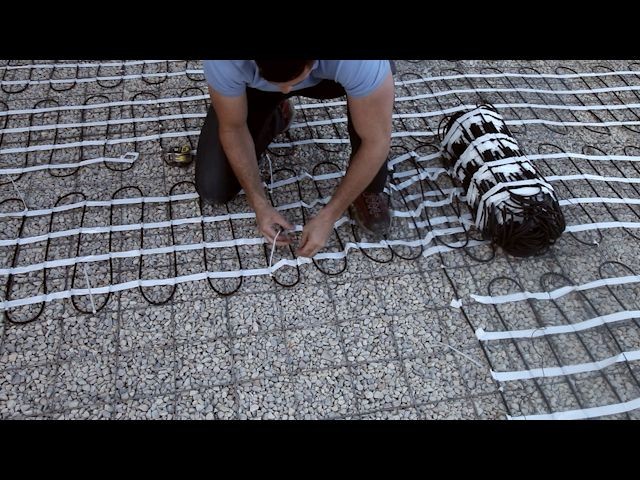
Installing snow melting mats
Installing snow melting system heat cable and securing it to the remesh.

Heating Cable – General Installation Tips:

 ► Maintain proper cable spacing. (Minimum spacing is 2 inches (center-to-center) and maximum cable spacing is 4 inches, center-to-center.)
 ► Do not allow the heat cables to touch each other.
 ► Never cut the heating cable.
 ► Make sure the heating cable is not resting on the ground prior to a concrete or asphalt pour. Secure the cable to remesh that is supported by Mesh-Ups or something similar. The installed heating cable should be 2 inches from the finished surface.
 ► In concrete applications, avoid running the heat cable through expansion joints. (The joint should be tooled or cut NO deeper than 1¼-inches, and the cable must be ¾ to 1-inch below the bottom of the joint.)
 ► Do not strain the cable splice by pulling on the cable.
 ► All of the cable must be embedded, including the entire splice and 6 inches of cold lead
 ► Do not bend the cable sharply. This may cause the insulation to pull away from the cable and eventually cause the cable to fail.
 ► When installing heat cable in paver applications, make certain that there is ½-inch of compacted paver sand or stone dust on top of the heating cables or mats. (Cables must be completely encased with no air gaps.)

Contact ProLine (866.676.9276) to learn more about our products and installation support, free training, and professional design and layout services.